Content Workflow

User level: Site Owner; Site Administrator; Site Editor; Site Author; Site Contributor


All content revisions pass through an optional content workflow.  There are three states within this workflow:

  • Draft - Content is in the process of being created / updated.  While in this state the changes remain unpublished and your current published version (if one exists) remains published for people to view
  • Needs review - Content which has been authored and is considered ready to be published by the author but may need to be checked or signed off by a user with a higher level role before being published
  • Published - Only one published version exists at any one time. If a Draft or Needs review version is marked as published, this version will replace the current published version

Expand All

If you have the Site Owner, Site Administrator, Site Editor, or Site Author role on a website and you browse to a page which you have permission to make changes to you will see the page editing menu. On this menu you can see the status of the current content and whether there is a draft in progress.

Publishing and draft statuses in the page editing menu

Output on a Mosaic site: Publishing and draft statuses in the page editing menu

When creating new content or when editing existing content a revision of that content is created or updated each time you save it.  To save a revision in one of the worfklow states, click the appropriate button:

  • Save as draft
  • Save for review
  • Publish now
  • Schedule publish
Workflow save state buttons

When new content is created, it is not displayed on the site until it has been moved to Published state.

For existing content, when a new draft is created, the previous published version of the content remains viewable on the live site until the new draft is published and replaces the previous published version.

The previous published version can be viewed and reverted to using the controls in the 'Moderation' section of the page edit mode - see the 'Moderating a revision' section, below.

Limits to the number of revisions

For Published revisions: a maximum of 10 revisions are retained.

For Draft/Needs review revisions: a maximum of 10 revisions are retained.

All revisions created in the last calendar month are retained. At the beginning of the following month the Drafts will be deleted back to the 10 draft revision limit.

See Manage Content documentation for more information about content revisioning.

There are three ways to move a revision between workflow states: use the four 'Save' buttons on the page edit screen; use the controls in the 'Moderate' screen; use the controls in the Manage Content > All Drafts and Needs review tabs.

Use the 'Save' buttons on the page edit screen

Edit the page and re-save the revision in a new state by clicking the appropriate button. See the 'Creating new revisions of your content' section, above.

Use the controls in the Moderate screen

Click on the 'Moderate' tab to view the moderation screen. This page lists the revisions of the current page, showing the published revision at the top in green and 'in progress' revisions in red. You can click on the buttons on the revision in progress to transition it to a new state.

Workflow moderation page

Use the controls in the Manage Content > All Drafts and Needs review tabs

In Manage Content, view the All Drafts and Needs review tabs to view a table of content saved in these states. If a user has the appropriate role, they will be able to move content to new states by clicking the links in the 'Set moderation state' column.

See the Manage Content documentation for more information.

The ability to transition content through the different workflow stages depends on user role. All user roles can create draft content. The table below illustrates the permissions of the user roles to move content to Needs review and Published satus.

  Site Owner Site Administrator Site Editor Site Author Site Contributor
Move own content to Needs review
Move any content to Needs review
Move own content to Published
Move any content to Published

Some items related to content are not goverened by workflow and take effect immediately when changed. These settings have been grouped up in to the 'Settings' screen in the page edit mode:

  • Menu settings - Provide menu link option; Menu link title; Parent item; Weight (for link positioning)
  • URL path settings - Generate automatic URL alias (based on page title) option; text field for new URL alias
  • Access control - Button to access control settings (set Oxford-only access to a page - if you have this enabled for your site)
  • Authoring information - Authored by (username); Authored on (date and time)

Buttons to Delete content and Copy a page are also located in this section.

When a Draft is in progress, Quickediting of a page is disabled. This is to stop any in progress updates being over-written by a Quickedit. Once the revision in progress is removed or published, Quickedit will be available for a page again.

When Quickedit is used to edit a page, a new revision of that page is created and immediately moved to a published state so the changes go live immediately.

See Page Editing documentation for more information about using Quickedit.

To unpublish a live (published) version of a page:

  • go to the page you want to unpublish
  • click on the 'Edit page' link to enter page edit mode
  • go to the 'Moderate' screen
  • next to the current published version of the page, click 'Unpublish' - and confirm you want to unpublish the version

This will unpublish the current published version and move it to draft state.

If a draft already exists, it will remain current, and the newly unpublished version will become an inactive revision of the page (visible in the list of revisions on the Moderate screen). 

Generate a time-limited link for viewing a draft version of a page without logging in. Use the preview link to let stakeholders see content before it's published. The preview link will stop working seven days after it is created.

To generate a draft preview link:

  1. Go to the page's edit mode > Moderate tab
  2. View the Moderation table and find the revision of the page you want to create a preview link for
  3. Click the revision's 'Generate preview link' button
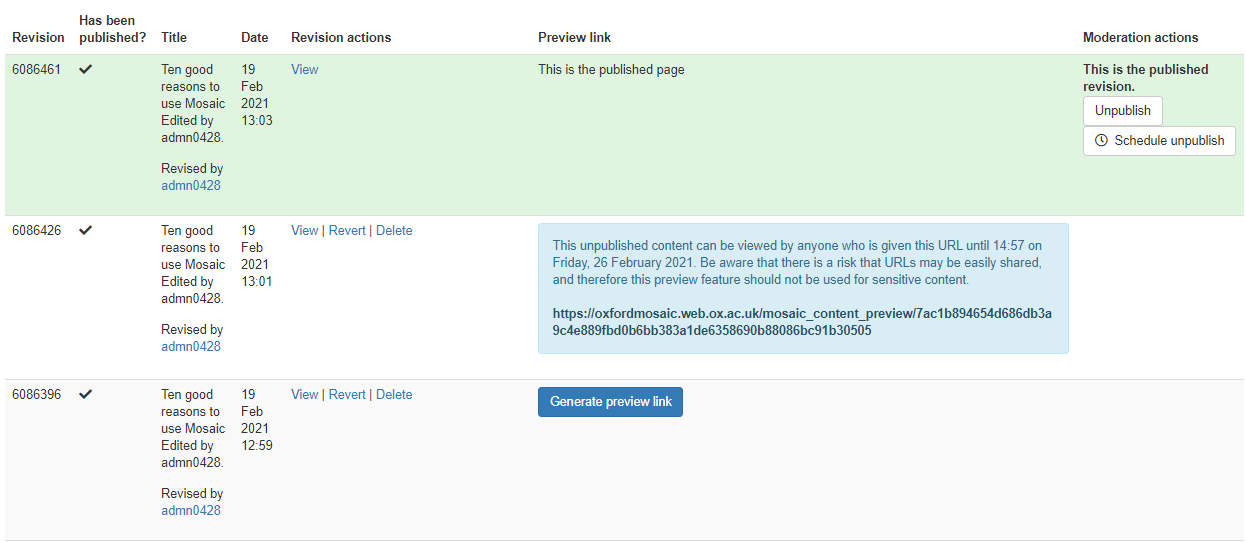
  4. Once generated, the preview link will be displayed in a blue information panel — along with the link's expiry time and date (example below). You can copy the preview link and share it as needed
    draft preview link generated in a page's moderation table

    Draft preview link information in a page's moderation table